I’ve been looking into Knative recently. In this 3-part blog series, I want to explain my learnings and show some hands on examples from the Knative Tutorial that I published on GitHub.
What is Knative anyway?
Knative is a collection of open source building blocks for serverless containers running on Kubernetes.
At this point, you might be wondering: “Kubernetes, serverless, what’s going on?” But, when you think about it, it makes sense. Kubernetes is hugely popular container management platform. Serverless is how application developers want to run their code. Knative brings the two worlds together with a set of building blocks.
Talking about building blocks, it consists of 3 main components:
- Knative Serving for rapid deployment and autoscaling of serverless containers.
- Knative Eventing for loosely coupled, event-driven services.
- Knative Build for painless code-to-container-in-a-registry workflows.
Let’s start with Knative Serving.
What is Knative Serving?
In a nutshell, Knative Serving allows for rapid deployment and autoscaling of serverless containers. You just tell specify what container to deploy and Knative takes care of details of how to create that container and route traffic to it. Once you get your serverless container deployed as a Knative service, you get features like automatic scaling, revisions for each configuration change, traffic splitting between different revisions and more.
Hello World Serving
To get your code deployed as a Knative service, you need to:
- Containerize your code and push the image to a public registry.
- Create a service yaml file to tell Knative where to find the container image and any configuration it has.
In Hello World Serving part of my Knative tutorial, I describe these steps in detail but to recap here, this is how a minimal Knative service definition service-v1.yaml looks like:
apiVersion: serving.knative.dev/v1alpha1
kind: Service
metadata:
  name: helloworld-csharp
  namespace: default
spec:
  runLatest:
    configuration:
      revisionTemplate:
        spec:
          container:
            # replace {username} with your DockerHub
            image: docker.io/{username}/helloworld-csharp:v1
            env:
              - name: TARGET
                value: "C# Sample v1"
runLatest implies that we want to deploy the latest version of our code right away with the specified container and configuration. Deploy the service:
kubectl apply -f service-v1.yaml
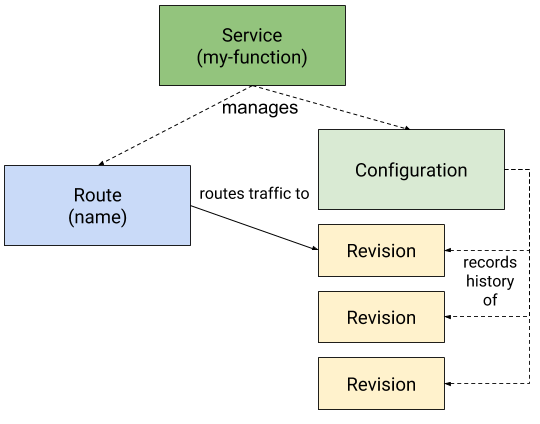
At this point, you’ll see a number of things created. First, a Knative service is created along with its pod. Second, a configuration is created to capture the current configuration of the Knative service. Third, a revision is created as a snapshot of the current configuration. Finally, a route is created to direct traffic to the newly created Knative service:
kubectl get pod,ksvc,configuration,revision,route
NAME                                                      READY     STATUS    RESTARTS
pod/helloworld-csharp-00001-deployment-7fdb5c5dc9-wf2bp   3/3       Running   0

NAME
service.serving.knative.dev/helloworld-csharp

NAME
configuration.serving.knative.dev/helloworld-csharp

NAME
revision.serving.knative.dev/helloworld-csharp-00001

NAME
route.serving.knative.dev/helloworld-csharp
Change Configuration
In Knative Serving whenever you change Configuration of the Service, it creates a new Revision which is a point-in-time snapshot of code. It also creates a new Route and the new Revision will start receiving traffic.

In Change Configuration section of my Knative Tutorial, you can see how changing the environment variables or the container image of the Knative service triggers creation of a new revision.
Traffic Splitting
You can split traffic between different revisions of a service very easily in Knative. For example, if you want to roll out a new revision (0004) and route 20% of traffic to it, you can do the following:
apiVersion: serving.knative.dev/v1alpha1
kind: Service
metadata:
  name: helloworld-csharp
  namespace: default
spec:
  release:
    # Ordered list of 1 or 2 revisions.
    # First revision is traffic target "current"
    # Second revision is traffic target "candidate"
    revisions: \["helloworld-csharp-00001", "helloworld-csharp-00004"\]
    rolloutPercent: 20 # Percent \[0-99\] of traffic to route to "candidate" revision
    configuration:
      revisionTemplate:
        spec:
          container:
            # Replace {username} with your actual DockerHub
            image: docker.io/{username}/helloworld-csharp:v1
            env:
              - name: TARGET
                value: "C# Sample v4"
Note that we changed from runLatest mode to release mode in order to split traffic for our service.
Traffic Splitting section of my Knative Tutorial has more examples such as how to split traffic between existing revisions.
Integrate with other services
Knative Serving lends itself well to integrate with other services. For example, you can use a Knative service as a webhook for an external service like Twilio. If you have a Twilio number, you can reply SMS messages sent to that number from a Knative service.
Integrate with Twilio section of my Knative Tutorial has the detailed steps but it essentially boils down to creating code to handle Twilio messages:
\[Route("\[controller\]")\]
    public class SmsController : TwilioController
    {
        \[HttpGet\]
        public TwiMLResult Index(SmsRequest incomingMessage)
        {
            var messagingResponse = new MessagingResponse();
            messagingResponse.Message("The Knative copy cat says: " + incomingMessage.Body);
            return TwiML(messagingResponse);
        }
    }
Defining a Knative service out of it:
apiVersion: serving.knative.dev/v1alpha1
kind: Service
metadata:
  name: twilio-csharp
  namespace: default
spec:
  runLatest:
    configuration:
      revisionTemplate:
        spec:
          container:
            # Replace {username} with your actual DockerHub
            image: docker.io/{username}/twilio-csharp:v1
And then specifying that Knative service as a webhook for Twilio SMS messages:

That’s it for Knative Serving. In the next post, I will be talking about Knative Eventing