Istio 1.0 is finally announced! In this post, I updated my previous Istio 101 post with Istio 1.0 specific instructions. Most of the instructions are the same but with a few minor differences about where things live (folder names/locations changed) and also most commands now default to kubectl instead of istioctl.
For those of you who haven’t read my Istio 101 post, I show how to install Istio 1.0 on Google Kubernetes Engine (GKE), deploy the sample BookInfo app and show some of the add-ons and traffic routing.
Create Kubernetes cluster
First, we need a Kubernetes cluster to install Istio. On GKE, this is a single command:
gcloud container clusters create hello-istio \
--cluster-version=latest \
--zone europe-west1-b \
--num-nodes 4
I’m using 4 worker nodes. That’s the recommended number of nodes for BookInfo sample.
Once the cluster is created, we also need to create a clusterrolebinding for Istio to be able to manage the cluster:
kubectl create clusterrolebinding cluster-admin-binding \
 --clusterrole=cluster-admin \
 --user=$(gcloud config get-value core/account)
Download & Setup Istio
Now that we have a cluster, let’s download the latest Istio (1.0.0 as of today):
curl -L [https://git.io/getLatestIstio](https://git.io/getLatestIstio) | ISTIO\_VERSION=1.0.0 sh -
Add Istio’s command line tool istioctl to your PATH. We’ll need it later:
export PATH="$PATH:./istio-1.0.0/bin"
Install Istio
It’s time to install Istio with mutual authentication between sidecars:
kubectl apply -f install/kubernetes/istio-demo-auth.yaml
Once it’s done, you can check that pods are running under istio-system namespace:
kubectl get pods -n istio-system
You’ll realize that in addition to Istio base components (eg. pilot, mixer, ingress, egress), a number of add-ons are also installed (eg. prometheus, servicegraph, grafana). This is different from the previous versions of Istio.
Enable sidecar injection
When we configure and run the services, Envoy sidecars can be automatically injected into each pod for the service. For that to work, we need to enable sidecar injection for the namespace (‘default’) that we will use for our microservices. We do that by applying a label:
kubectl label namespace default istio-injection=enabled
And verify that label was successfully applied:
kubectl get namespace -L istio-injection
Deploy BookInfo app
Let’s deploy the BookInfo sample app now:
kubectl apply -f samples/bookinfo/platform/kube/bookinfo.yaml
And make sure all the pods are running. Notice that there are 2 pods for each service (1 the actual service and 1 sidecar):
kubectl get pods
Deploy BookInfo Gateway
In Istio 1.0.0, you need to create a gateway for ingress traffic. Let’s go ahead and create a gateway for BookInfo app:
kubectl apply -f samples/bookinfo/networking/bookinfo-gateway.yaml
Use BookInfo app
We can finally take a look at the app. We need to find ingress gateway IP and port:
kubectl get svc istio-ingressgateway -n istio-system
To make it easier for us, let’s define a GATEWAY_URL variable:
export INGRESS\_HOST=$(kubectl -n istio-system get service istio-ingressgateway -o jsonpath='{.status.loadBalancer.ingress\[0\].ip}') export INGRESS\_PORT=$(kubectl -n istio-system get service istio-ingressgateway -o jsonpath='{.spec.ports\[?(@.name=="http2")\].port}') export GATEWAY\_URL=$INGRESS\_HOST:$INGRESS\_PORT
Let’s see if the app is working. You should get 200 with curl:
curl -o /dev/null -s -w "%{http\_code}\\n" [http://${GATEWAY\_URL}/productpage](http://$%7BGATEWAY_URL%7D/productpage)
You can also open a browser and see the web frontend for product page. At this point, we got the app deployed and managed by a basic installation of Istio.
Next, we’ll take a look at some of the add-ons. Unlike previous versions, add-ons are automatically installed already. Let’s start sending some traffic first:
for i in {1..100}; do curl -o /dev/null -s -w "%{http\_code}\\n" [http://${GATEWAY\_URL}/productpage;](http://$%7BGATEWAY_URL%7D/productpage;) done
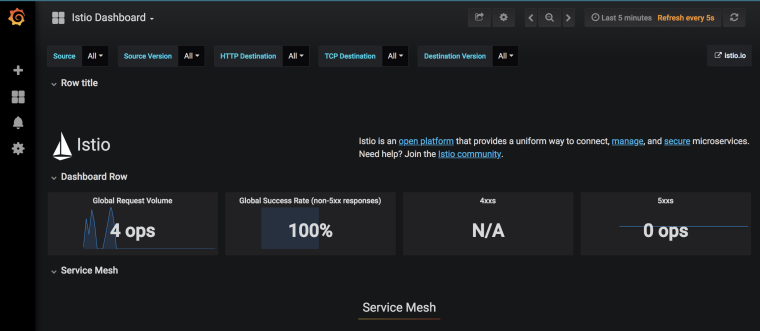
Grafana dashboard
There’s Grafana for dashboarding. Let’s setup port forwarding first:
kubectl -n istio-system port-forward $(kubectl -n istio-system get pod -l app=grafana -o jsonpath='{.items\[0\].metadata.name}') 8080:3000
Navigate to http://localhost:8080 to see the dashboard:
Prometheus metrics
Next, let’s take a look at Prometheus for metrics. Set port forwarding:
kubectl -n istio-system port-forward $(kubectl -n istio-system get pod -l app=prometheus -o jsonpath='{.items\[0\].metadata.name}') 8083:9090
Navigate to http://localhost:8083/graph to see Prometheus:

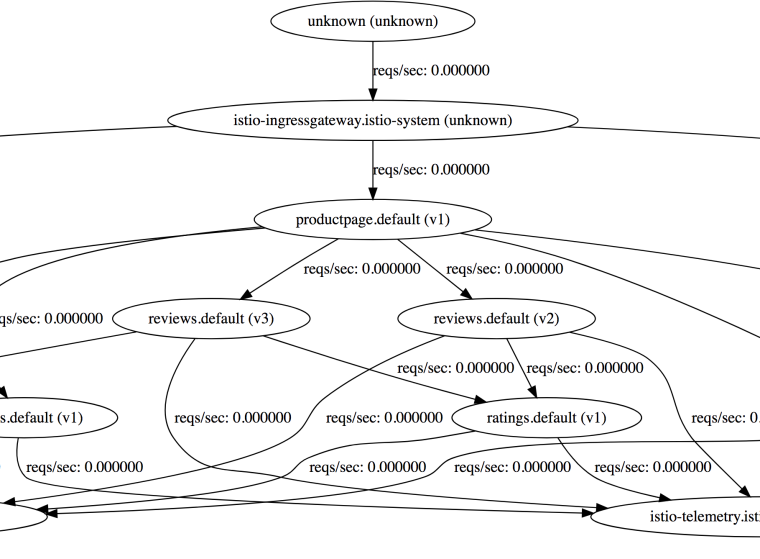
ServiceGraph
For dependency visualization, we can take a look at ServiceGraph:
kubectl -n istio-system port-forward $(kubectl -n istio-system get pod -l app=servicegraph -o jsonpath='{.items\[0\].metadata.name}') 8082:8088
Navigate to http://localhost:8082/dotviz:
Tracing
For HTTP tracing, there is Jaegar and Zipkin. Let’s take a look at Jaeger. Setup port forwarding as usual:
kubectl port-forward -n istio-system $(kubectl get pod -n istio-system -l app=jaeger -o jsonpath='{.items\[0\].metadata.name}') 8084:16686
Navigate to http://localhost:8084

Traffic Management
Before you can use Istio to control the Bookinfo version routing, you need to define the available versions, called subsets, in destination rules. Run the following command to create default destination rules for the Bookinfo services:
kubectl apply -f samples/bookinfo/networking/destination-rule-all-mtls.yaml
You can then see the existing VirtualServices and DestinationRules like this:
kubectl get virtualservices -o yaml kubectl get destinationrules -o yaml
When you go to the product page of BookInfo application and do a browser refresh a few times, you will see that the reviews section on the right keeps changing (the stars change color). This is because there are 3 different reviews microservices and everytime, a different microservice is invoked. Let’s pin all microservices to version1:
kubectl apply -f samples/bookinfo/networking/virtual-service-all-v1.yaml
This creates VirtualServices and DestinationRules needed to pin all microservices to version1. Now, if you back to the product page and do a browser refresh, nothing changes because reviews microservice is pinned to version1 now.
To pin a specific user (eg. Jason) to a specific version (v2), we can do the following:
kubectl apply -f samples/bookinfo/networking/virtual-service-reviews-test-v2.yaml
With this rule, if you login to the product page with username “Jason”, you should see the v2 version of reviews microservice.
To clean up all destination rules, run the following and now we’re back to the beginning with 3 different versions of the microservices:
kubectl delete -f samples/bookinfo/networking/virtual-service-all-v1.yaml
Cleanup
This wraps up all the basic functionality of Istio 1.0.0 that I wanted to show on GKE. To cleanup, let’s first delete the BookInfo app:
kubectl delete -f samples/bookinfo/networking/bookinfo-gateway.yaml kubectl delete -f samples/bookinfo/platform/kube/bookinfo.yaml
Confirm that BookInfo app is gone:
kubectl get gateway
kubectl get virtualservices
kubectl get pods
Finally, cleanup Istio:
kubectl delete -f install/kubernetes/istio-demo.yaml
Confirm that Istio is gone:
kubectl get pods -n istio-system